Taco Monsters
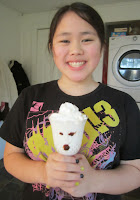
Sophia's taco monster.
The pin for taco monsters led to a recipe at the Examiner that used ground turkey mixed with carrot puree and baby spinach puree. I knew the girls would not like this as much as the tacos we normally have, so I opted just to make a regular batch of tacos.
This is nothing fancy: it's just a pound of hamburger (fried and drained) with 3/4 cup of water and the Oretega taco seasoning. Easy and quick to make...especially after a long day.
In addition to these ingredients, we used:
- 1 plum tomato, cut length-wise into several pieces (use a knife to round off the edges to resemble a tongue)
- 12 pimiento-stuffed green olives
- 3 slices cheddar cheese
- 6 taco shells
- chopped onion
- chopped yellow pepper
- salsa
Cut each tomato lengthwise into several pieces. Round off edges with a knife, as needed. The remaining inside of the tomato may be chopped for additional taco filling, if desired.
Cut slit into 1 side of each olive to make a flat side.
Cut each of the slices of cheese in half vertically in a zigzag line to look like teeth.
Arrange taco shells on a plate and microwave for about a minute or so, or until hot.
To assemble, fill tacos with desired fillings so that hamburger is on the top.
Olivia placing taco filling in a shell
to make her taco monster.
Placing each taco on its side on serving plate, insert one tomato slice into meat filling to look like tongue.
Olivia placing the taco on its side.
Place one cheese slice with zigzag edge toward meat along top side of taco between the shell and the filling.
Taco with olive eyes, a tomato tongue, and cheese teeth.
Place two olives, flat sides down, to look like eyes on top of shell.
Dinner - taco monsters and grapes followed by
boo-nilla shakes for dessert.
Boo-Nilla Shakes
Three Boo-Nilla Shakes ready to eat!
For dessert, we enjoyed Boo-Nilla Shakes - a recipe from Martha Stewart Living magazine. I had the recipe in my files for many years, but never made it around Halloween. This year, though, I was determined to add it to the list of recipes to try.
Looking on Pinterest after we made the recipe, I did find a pin for the shakes. It led to Martha Stewart's website. It noted in the description to melt chocolate chips and with a paintbrush apply the melted chocolate the side of the glass and let it harden before adding the shake. (We were wondering how the faces were so perfectly applied and stayed once the shake was added.)
Since that part of the shake wasn't noted in the recipe, we ended up using chocolate syrup and then adding the shake. It's not the same as melted chocolate chips, but Sophia and Olivia were pleased with the Boo-Nilla Shakes nonetheless.
Sophia with her shake.
The recipe noted the following ingredients for making six shakes:
1 cup whole milk (we used skim milk)
2 pints vanilla ice cream (4 cups)
1 cup heavy cream
1 tablespoon confectioners' sugar
Without reading the instructions, I put all of these ingredients in the Vita-Mix mixer and blended them together. Sophia mixed them and then I realized that the heavy cream and confectioners' sugar should have been used for the whipped topping. Whoops...
(If I had followed the recipe, this is what should have been done: Blend milk and 1 pint ice cream in a blender until smooth. With machine running, add remaining pint ice cream, one scoop at a time; blend until smooth. Pour milkshake into six 8-ounce glasses decorated with chocolate faces, filling them 3/4 full.
(Put cream in the bowl of an electric mixer fitted with the whisk attachment. Beat on medium speed until soft peaks form. Add confectioners' sugar. Beat until stiff peaks form.Transfer whipped cream to a pastry bag fitted with a 1/2-inch plain round tip (such as Ateco #806). Pipe spiral mounds of whipped cream on top of milkshakes.
(For 12 faces, place 1/3 cup (2 ounces) semisweet chocolate chips in a microwave-safe bowl; microwave on high until melted, 1 to 1 1/2 minutes; stir. Using a small brush, paint chocolate inside glasses (if it hardens too soon, microwave 20 seconds more). Let set a few minutes before adding shake. Prepare glasses up to a day ahead, but don't fill until ready to serve.
Serve immediately.)
So, I put the chocolate syrup in the cups with the edge of a knife. Then I poured the shake into each of the cups. Last, Sophia used the canned whipping cream to add the top to the monster shake.
Even though I didn't follow the recipe, we all agreed that this shakes were the best we had ever had. I think the addition of the heavy cream made quite a difference.
Olivia with her shake.
We definitely will make these recipes again next year...and in the same way that we did this year. Sometimes making things the way that you know that your family will eat...or making things the wrong way by accident - actually turn out surprisingly well!


No comments:
Post a Comment